How To Mic A Cello

The most common placement for miking a cello is to place a wide-diaphragm condenser mic directed at the F-holes of the instrument. A distance of anywhere from 6″ to 3′ is appropriate, depending on the desired amount of room sound and bass response. As with the violin, a cardioid pickup pattern is usually a good choice, or omni and bi-directional patterns can be used when recording in an acoustically pleasing room.

See also How To Mic A Violin or Viola

This is an excerpt from The Encyclopedia of Home Recording, a complete reference for the home recording studio by Mark Garrison. For more information about this book, please visit homerecordingbook.com.

How To Mic Violin or Viola

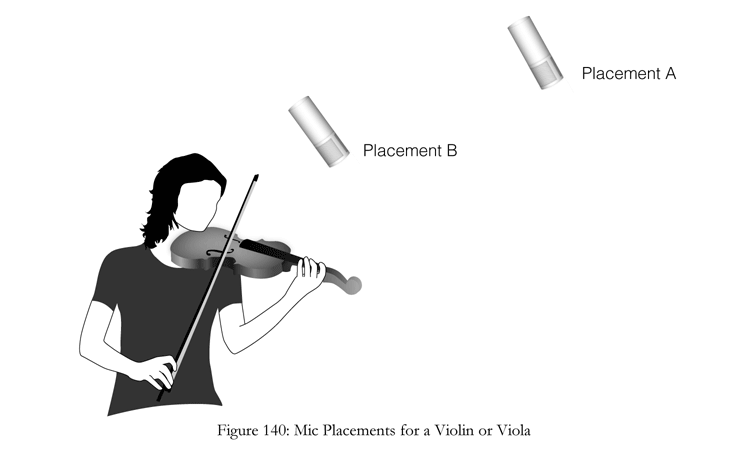
A wide-diaphragm condenser mic is a typical choice for miking violins or violas, though a ribbon mic can be also be a very good choice for certain styles of music. The cardioid pickup pattern is usually best for this application, but a bi-directional or omni pattern can be very effective when recording in a flattering room.

For classical music, a distance of 3–8′ above and away from the performer is generally used for a nice, smooth tone. For fiddle music, the same technique can also be used, or the mic can be placed closer (6–8″) for a more raw, folky tone. In both cases, the mic should be facing the top of the instrument (see Fig. 140).

mic placement for a violin or viola

This is an excerpt from The Encyclopedia of Home Recording, a complete reference for the home recording studio by Mark Garrison. For more information about this book, please visit homerecordingbook.com.

How To Mic An Electric Bass

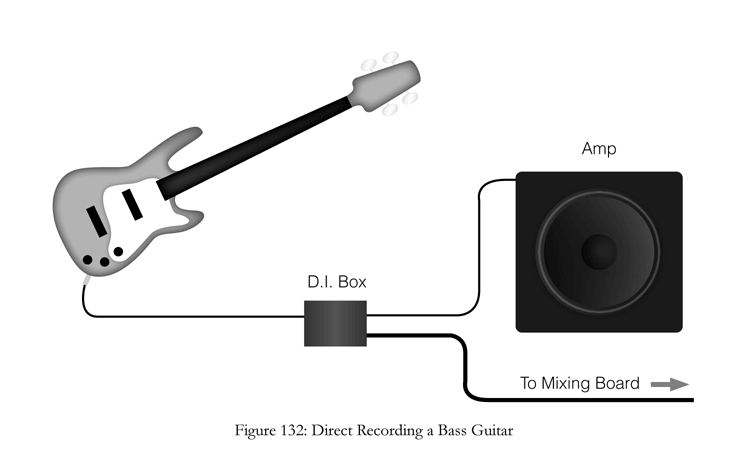
It is very common to record electric bass directly by running it into a DI box (see Fig. 132). The main advantages of this are ease of setup and prevention of sound bleed from other instruments recorded at the same time. Additionally, the tone from direct recording an electric bass is usually quite good, so many choose to stick with this method.

Direct Recording An Electric Bass

When direct recording, the performer can have their signal run through headphones, though some bass players prefer to have their amp running because they are used to feeling its rumble as they play.

If a bass amp with desirable tone is available, miking the amp is also a great option and in many cases can result in a better tone and solid low-frequency response. As with miking a guitar amp, the mic can be placed very close (1–2″) to the amp, and placing the mic at the center of the speaker will result in brighter tone, while placing it towards the edge provides mellower tone.

This is an excerpt from The Encyclopedia of Home Recording, a complete reference for the home recording studio by Mark Garrison. For more information about this book, please visit homerecordingbook.com.

How To Mic An Upright Bass

The desired tone for an upright bass will depend on the style of music being played. Common microphone choices are a large-diaphragm condenser mic or a large-diaphragm dynamic mic, usually in a cardioid pickup pattern. It is important that the mic chosen have a good low-frequency response.

Getting the right tone from an upright bass can be tricky, so it is important to take time to try different mic positions. Here are some places to start:

  • 6–12″ from the F-hole on the treble side of the instrument.
  • Pointed directly at the bridge from a distance of 6–12″.
  • The point where the neck meets the body.
  • Pointed at the fingerboard from about 1′ away. This position will not have a lot of body, so it is best used in conjunction with another placement.
This is an excerpt from The Encyclopedia of Home Recording, a complete reference for the home recording studio by Mark Garrison. For more information about this book, please visit homerecordingbook.com.

How To Mic An Electric Guitar

When miking a guitar amplifier, the most common mic choices are a moving-coil dynamic or a wide-diaphragm condenser in a cardioid or hyper-cardioid pickup pattern. The Shure SM-57 has long been a standby as a workhorse dynamic mic and is a popular choice for close miking guitar amps. When using a condenser mic in a close placement, it’s advisable to check the SPL (sound pressure level) rating of the mic to make sure that it can handle the volume that is coming out of the amp.

Close miking an amplifier can be done on- or off-center to the speaker (see Fig. 131), meaning that it can be directed either at the center or the cone of the speaker. Miking the center will give a brighter tone, with the tone becoming more mellow as the mic is moved towards the edge of the speaker.
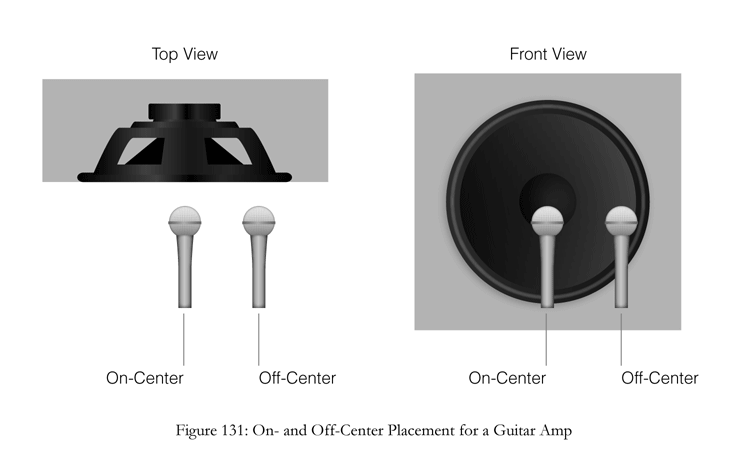
Mic Placement For A Guitar Amp

Placing a mic inside the back of the speaker cabinet provides thick, full tone from some amplifiers. Note that this placement will be 180˚ out-of-phase with mics placed on the front of the amp, so if they are being blended together, the phase will need to be reversed on this signal.

Placing mics at a distance of a few feet from the amp can also create a big sound, although the tone will be heavily affected by the room this is done in.

Recording the output of the guitar directly is also an option but has its own set of considerations. For clean, jazzy styles of music, the direct signal can be recorded by running the output of the guitar into a DI box. An overdriven electric guitar, however, creates some harsh sounding harmonics, which are smoothed out by the amplifier’s deliberately unresponsive speakers. For this reason, it is usually best to use an amp or speaker emulator when direct recording for rock, blues, and other gritty styles of music. Amp and speaker emulators can be found as standalone units or in software.

There are two main benefits of recording electric guitar in this manner. First, setup is more convenient and problems of signal bleed are reduced or eliminated when recording multiple instruments in the same room. The second benefit is that amp emulators offer the tone of a wide range of amplifiers, adding tonal versatility at a relatively low cost.
This is an excerpt from The Encyclopedia of Home Recording, a complete reference for the home recording studio by Mark Garrison. For more information about this book, please visit homerecordingbook.com.

How To Mic An Acoustic or Classical Guitar

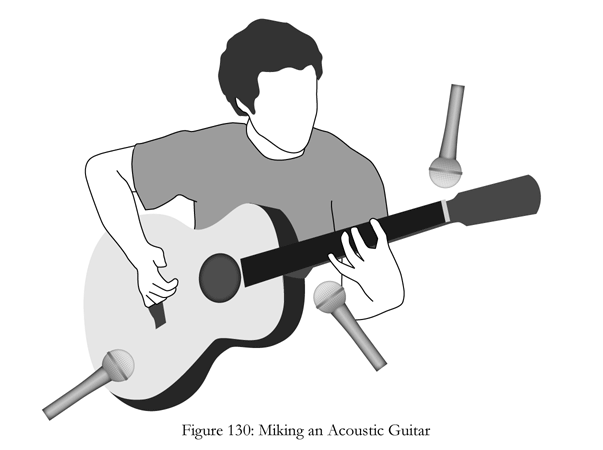
Many novice recordists fall into the pitfall of recording an acoustic guitar by placing the mic directly in front of the soundhole. While this placement provides plenty of volume, it rarely offers great tone. Below are a few popular placements (see Fig. 130). Most engineers will choose a bright-sounding condenser mic for these applications.

  • Pointed at the top of the body, just below the bridge an a distance of 5–6″.
  • Pointed at the 12th fret with distance of 3–5″.
  • Miking the nut at a distance of roughly 1″ offers a very bright sound. On its own this placement rarely has much body but can be blended with another mic placement to add sparkle. This can be done with a clip-on style condenser mic designed for drums or horns – but be sure to cut low frequencies, as the vibrations through the clip can cause some deep rumble.
  • Some recording engineers will record a feed directly off an acoustic pickup and blend it in with the miked sound. This can add brightness and help the acoustic cut through a mix. Recording the pickup, however, rarely sounds natural on its own.
  • Stereo techniques such as X-Y and ORTF can be very effective as well. These techniques are explained in the Stereo Miking Techniques section below.

The most common mic to use on acoustic instruments is a condenser mic. The choice of pickup pattern will depend on the acoustics of the room and if there are any other instruments or sounds in the room that you are trying to avoid. Cardioid or hyper-cardioid patters are safest, though in a nice-sounding room it can be beneficial to experiment with bi-directional or omnidirectional microphones.

Miking an Acoustic Guitar

This is an excerpt from The Encyclopedia of Home Recording, a complete reference for the home recording studio by Mark Garrison. For more information about this book, please visit homerecordingbook.com.